Materials needed: Saturated uranyl acetate stain in aqueous or ethanol solution, small glass Petri dish set (dish plus the lid) containing about 4 mm of hardened dental wax embedded in the bottom dish, twice-distilled water in a squeeze bottle, 0.02 N sodium hydroxide aqueous solution in a squeeze bottle, Reynold's lead citrate stain, fine forceps, 5 cc syringe with attached 0.2 um micro-pore filter, Whatman filter paper cut into small wedges, Whatman #2 filter paper (5.5cm diameter), plastic or glass transfer pipet, Ludlum Model 3 survey meter, lead shield, waste containers, bench coat paper, lab coat and/or plastic apron, double gloves, safety goggles, timer.
Procedure:
A. Uranyl acetate staining
-
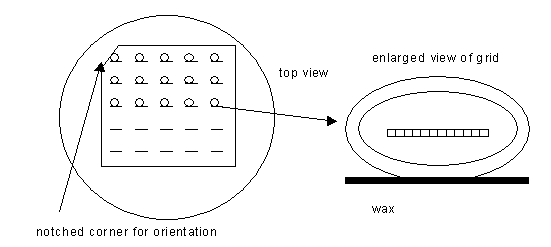
Load the Synaptek grids into the pre-made razor slits in the wax floor of the staining dish in an orderly array. To do this, grasp grid #1 very tightly, with forceps positioned on the broad side of the grid, as diagrammed:

Then, partially insert this grid, about 0.5 mm deep, into the first pre-made slit. Note that the #1 position is closest to the notched corner. If the slit is well worn and not holding the grid securely, then make another slit nearby and re-insert grid. Continue to load up any remaining grids, in order, five to a row. See diagrams:

- Since uranyl acetate is considered radioactive, do all staining in a designated area. Follow the procedures and use the equipment described in the protocol entitled "Monitoring for Radioactivity".
- Once all the grids are loaded into the wax bottom of the staining dish, then prepare to stain them with uranyl acetate. Use a plastic transfer pipette to draw about 5 mls of the saturated uranyl acetate stain from the stock bottle (stored in the 4 degree C refrigerator) and place it into the 0.2um micropore filter-capped syringe. Attach the plunger to the syringe barrel and prepare to dispense filtered uranyl onto the grids.
- Next, add the filtered uranyl acetate stain to the grids, cover with glass cover and stain for 5 minutes.
- After 5 minutes, pour off the stain into a waste container. Then, rinse the grids by directing a gentle stream of water against the side of the interior glass dish, not on the grids directly. Pour off the rinse water into the waste container. Repeat the water rinses 5 to 10 times.
-
Use the filter paper wedges to wick the grids dry of water. To do this, carefully place the paper to the side of each grid. Dispose of these filter papers in a designated waste container bag for uranyl acetate. See diagram:

- Then, cover the staining dish set for now. Dispose of the uranyl acetate contaminated filter-capped syringe and plastic pipette. It is a good time now to check if your outer pair of gloves has any uranyl acetate contamination on them. To do this, place your hands over the probe, one finger at a time and monitor for any radioactivity. If any detected on the outer gloves, then remove them. Start at the wrist and peel off one glove at a time. Discard these gloves into the designated waste container bag. Then, monitor the inner pair of gloves for any activity. Hopefully, the inner gloves are clean. Put on a new pair of outer gloves. Then wrap the covered stock bottle of uranyl acetate with new Parafilm and return the bottle to the refrigerator. Re-check your hands for any radioactive contamination. Remove the outer gloves anyway and put on new outer gloves. Prepare to move on to lead staining.
B. Reynold's lead citrate staining
- Following uranyl acetate stain, the grids are ready to be further stained with lead. Place a 5.5 cm diameter filter paper into the underside of the glass lid cover. Apply enough 0.02 N sodium hydroxide solution just to moisten the paper so that it will adhere.
- Apply the lead citrate stain from the needle-capped syringe to the grids. Then cover and stain for 5 min.
- Pour off the lead stain into a designated waste container.
- Gently apply a stream of the 0.02 N sodium hydroxide (aqueous) solution as a first rinse to grids. Pour this off into the waste container.
- Next, apply 5 to 10 water rinses, in the same manner.
- Next, wick the grids dry.
- At the end of the staining session, monitor one's self and work area for radioactivity, according to protocol. Place all contaminated disposable materials into designated waste containers.
- Transfer the grids back into their grid box. As the grids are being transferred, examine each one under stereomicroscope to see how they look. If a hole was made in the Pioloform film, distant to the section, it is possible to repair this hole. See Pioloform repair in the "Special Procedures" section of the Coating Grids protocol. If any sections are missing, or are wrinkled or dirty, then the grid or series is most likely unusable. You may choose to discard this series, as a result.
- Allow these recently stained grids at least a day to thoroughly air dry. Later, the serial sections may be loaded into either gimbols (to be viewed in the JEOL 1200 EX electron microscope) or glued onto hexagonal rings (to be viewed on the JEOL 2010 electron microscope).