The diamond Cryo-Trim Tool from Electron Microscopy Sciences/Diatome, U.S., Fort Washington, PA, (cat # CTT) creates perfect, very small trapezoids, which facilitates serial thin sectioning. It is the diamond trim tool, when used correctly, that can reliably trim a trapezoid with a parallel top and bottom. A trapezoid, as small as 30 um in length, 50 um in base width and 15 um in height, for example, can produce one long continuous ribbon of many tightly linked sections. A 200 section long ribbon from this trapezoid, for example, must then be subdivided into shorter segments and picked up on several Pioloform-coated slot grids. On the other hand, a 200 section long ribbon cut from a ridge pyramid can be collected on a single grid (See protocol of Ridge Pyramid Trimming). In any event, it is the sequential array of many small sections that expedites the photography on the electron microscope.
Among the requirements needed for cutting series: A small, draft-free room and a draft shield on the ultramicrotome. Also, a calm frame of mind since serial sectioning is labor intensive.
Materials:All the same materials used in thin sectioning plus a diamond Cryo-Trim Tool (Diatome, U.S., cat # CTT), can of Dust-Off.
Procedure:
A. Selecting a Site for the trapezoid on the Block Face
- Select a site for the trapezoid. This decision may be based on studying the Toluidine Blue stained thick sections and electron micrographs taken of the test thin sections (See EM Photography chapter). Measure the distance of the proposed trapezoid site from the tissue edge directly, either on the Toluidine Blue stained section or from the EM negative or print. This distance in um will then be measured off on the Epon block itself.
- Place the Epon block into the chuck and secure tightly. A secure block makes for stability in section thickness uniformity.
- Place the chuck into the trimmer stand and secure onto the stage of the microtome. Turn on the bottom light source. The trimmer stand is hollow so that the bottom light source can shine through the Epon block. Turn off all the overhead lights to reduce distraction.
-
View the block face through the binoculars at 4X magnification with the reticule superimposed over the tissue region as diagrammed:

- At 4X magnification, each grid square equals 250 um square. Note that each numeral/letter sits over the halfway mark, dividing the square in half. One can then visually further subdivide the half into halves, quarters, thirds, fifths, etc. The reticule is a reliable tool to measure horizontal distances across the block face, that is, from left to right or vice-versa. Unfortunately, vertical measures seem distorted and inaccurate. To get around that, merely rotate the block 90 degrees or 180 degrees, in order to obtain good horizontal measures.
-
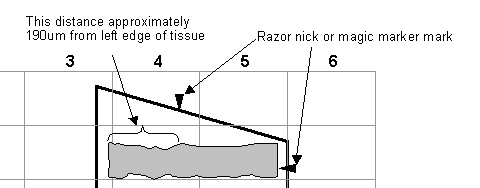
Use the reticule as a ruler to measure the distance from a particular edge of the tissue to where the proposed center of the trapezoid should be (based on a previous decision). Mark off this distance in um by placing a very small but deep razor or a scalpel nick in the Epon over the middle of the proposed trapezoid site. Or make a marking with a magic marker. If a second nick mark, also denoting the center of the trapezoid, is needed in another region of the block, then do so. See diagram:
- Decide on the orientation of the trapezoid. This is something to consider when the tissue sits at the very edge of the Epon block, as in a flat mold block. See diagram:
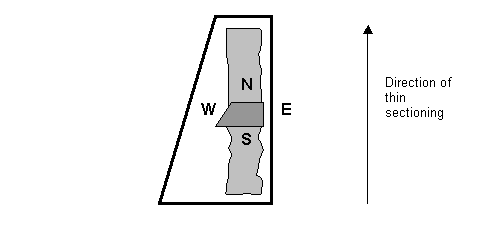
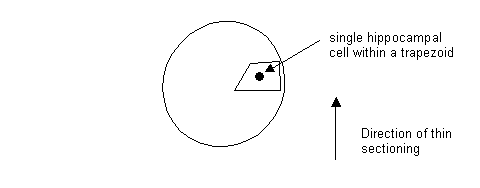
The top and bottom, or north and south facets, are the critical areas of a trapezoid. It is the perfect parallelism and facing of the top/bottom that produces tightly linked sections or ribbons. The least critical sides are the left/right or west/east sides. Therefore, place the trapezoid where the north/south aspects will most be supported by surrounding Epon, as diagrammed above in flat blocks. On a BEEM block, the tissue usually sits in the middle of the Epon block, unless it contains the monolayer of cells. If a single cell of interest sits at the edge of a BEEM block, then the same consideration for optimal trapezoid placement is required. See diagram:
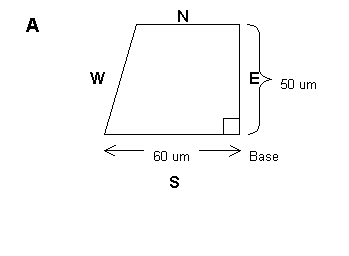
Note that all of the trapezoids depicted here are not true trapezoids, but actually one-sided trapezoids. It was discovered that this one-sided configuration is less work to create and offers more cohesiveness and stability of the ribbon-making process. See diagrams:
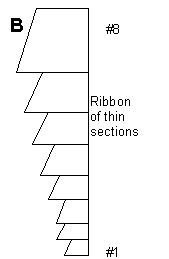
B. Creating the trapezoid.
- Following the razor or scalpel nick procedure or marking the block with a fine magic marker, (as long as the marking continues to be seen following trapezoid trimming) proceed to the next step. Return the block/chuck into the specimen arm and secure tightly. IT IS CRITICAL THAT ALL COMPONENTS OF THE ULTRAMICROTOME, E.G., BLOCK, KNIFE, BLOCK HOLDER, KNIFE HOLDER, STAGE, ETC., ARE SECURELY TIGHTENED THROUGH OUT ANY TISSUE SECTIONING AND ESPECIALLY DURING SERIAL SECTIONING.
- Presumably all the previous cutting performed on a particular block has been done at 0, 0 degree block/stage angle. This ensures that the block face will always be in the same plane, regardless of being rotated 90 degrees, which is part of the trapezoid trimming procedure. If, indeed, the block has not been cut at the 0, 0 settings, then the block will be out of plane when rotated. This is a special problem and will be discussed in Special Procedures at the end of this section.
- Set the clearance angle to 3 to 4 degrees. Lock in this setting.
- Place the diamond Cyro-Trim tool into the knife holder and secure tightly.
- Set the cutting speed to 1 mm/sec.
- Set the section thickness to either 0.5 or 1 um increments.
-
Orient the block so that the north/south aspects are to be trimmed first, but this is personal preference. See diagram:
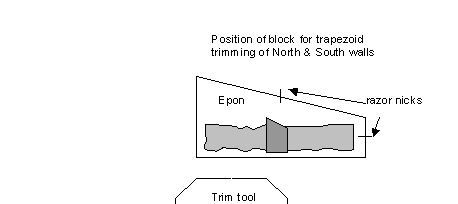
- Set the length of the cutting window.
-
Note the configuration of the 45-degree sloped trim tool. See diagram below. Trimming a trapezoid with this type of knife will produce a raised trapezoid that is pyramidal. Overall, the pyramidal shape offers greater mechanical stability for cutting serial sections. Know that for every um deep of tissue removed by the trim tool, one um of tissue sideways will also be removed. Thus, the top of the trapezoid will have a smaller area than at its base. Consequently, the sections in a ribbon will get consecutively larger.
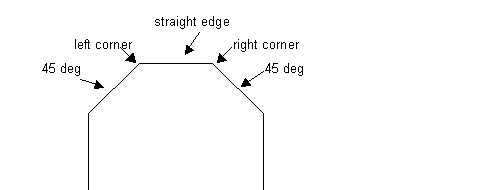
See the following diagram of a trapezoid that is approximately 40 um long X 80 um wide (base) X 10 um high. We will create a trapezoid with these same dimensions.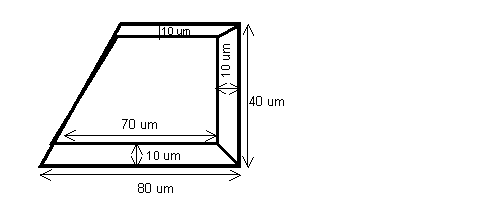
-
Advance the trim tool close to the area of interest on the block face. Align either the left or right side of knife-edge to block face. Use the right corner of knife if one intends to start trimming the south aspect first. Alternatively, use the left corner of knife if one intends to trim the north aspect first. See diagrams below.

If the horizontal plane of the block face is slightly out of alignment, then adjust the knife stage accordingly. If the vertical plane is slightly out of alignment, then section off a few microns of tissue, using the trim tool to evenly face the block. Assuming the block had always been cut at 0, 0 degrees angle setting, then the alignment changes should be minimal.
Following the alignment, the next step is to position the right corner of the knife (or the left corner, depending whether the north or south side will be trimmed first) below the scalpel-nicked area but then, move the knife corner 30 um to the left of it. (Remember that the scalpel nick marks the center of the trapezoid). Use the reticule at 4X magnification to measure this distance. See above diagrams.
Another approach is to measure the required distance from the tissue edge, as long as the tissue can be clearly differentiated from surrounding Epon at 4X magnification. See diagram below.
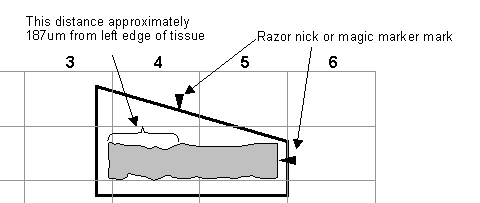
- Advance the knife-edge even closer to the block face. Then turn on the ultramicrotome. Allow 10 to 11 um of tissue to be removed. Then stop the ultramicrotome on the downswing of the block. Next, retract the knife a few mm away from the block.
- Move the knife stage over to the right, in this case. Position the left corner of the knife under the nick mark and then move 30 um to the right of it. Or, position the left knife corner 50 um to the right of the newly cut edge of the trapezoid. DO NOT CHANGE THE KNIFE/STAGE ANGLE OR THE BLOCK ANGLE! Advance the knife to the block face. Start the ultramicrotome and remove 10 um of tissue. Then stop the microtome on the down swing. Retract the knife. Use the Dust-Off to blow away the Epon trimmings from the knife corners. The appearance of the block face should now include a raised bar of tissue (10 um high) with 45 degree sloping sides.
- Rotate the block 90 degrees counterclockwise.
-
Prepare to trim the one straight side of the trapezoid. Decide which side it is to be. Again, this can depend on the position of the tissue in the block. If the tissue sits at the very edge of the Epon block, then it is recommended that this edge become the straight side. See diagram:
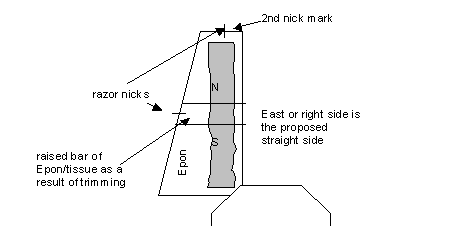
- Align the left edge of the knife to the raised bar of tissue. See above diagram. Adjust only the knife/stage angle if needed.
- Position the left corner of knife under the 2nd nick mark, if there is one, and move now 50 um to the right of it and begin to trim away 10 um of tissue. If working with a thin tissue slice that is already 50 to 100 um thick, it is just as easy to measure off this slice as a reference. When finished, stop the microtome on the down swing. Retract the knife.
- Rotate the block counterclockwise 10 degrees or the equivalent of two divisions on the specimen arm. This is to orient the block for the angled left or west wall of trapezoid. Swing the knife over to the right.
-
Advance the knife towards the block. Position the right edge of knife for alignment against the partially made trapezoid See diagram:
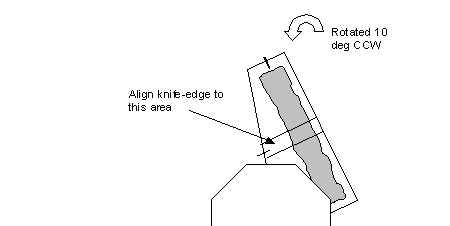
- Position the right corner of knife 90 um to the left the newly cut east wall of trapezoid (you may have to rotate the eyepiece reticule to follow the 10 degree rotation of the block). Advance the right knife corner to block and trim away 10 um. When finished, stop microtome on down swing. Retract knife away from block.
-
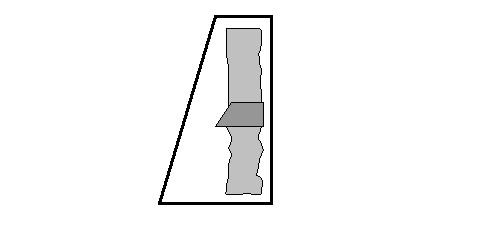
Rotate the block 10 degrees clockwise to position the block for serial sectioning. See diagram:
-
Before starting any serial sectioning, it’s a good idea to trim back the far reaches of the Epon block with the trim tool. These distant areas can tend to protrude as the trapezoid is sectioned down in serial sectioning. To do this, rotate the block 90 degrees clockwise again. Then trim away about 10 to 30 um from the extreme left and rights sides of the block. See diagram:
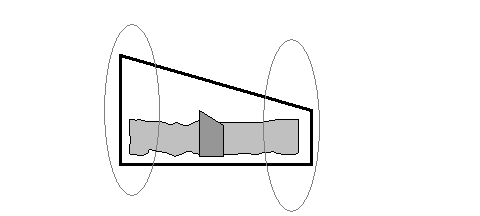
-
When finished, retract knife from block. Rotate block 90 degrees counterclockwise. In this position, the block is ready for serial sectioning! See diagram:
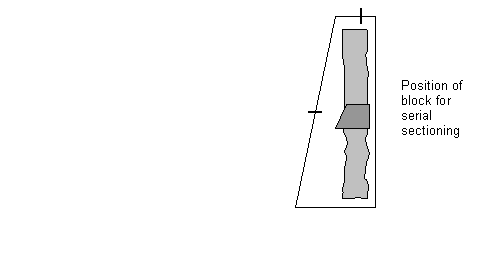
- You are now finished with the diamond trim tool. Prepare to clean the trim tool as follows: Soak the beveled tip of a styrofoam rod in 100% ethanol for a minute and then lightly, draw it across the knife-edges. Next, remove the diamond trim tool from the holder. Then place the knife-edge under running 2X distilled water to rinse any ethanol from it. Next, inspect the knife-edge under the stereomicroscope for any remaining debris. Next, allow the knife to air dry for several minutes. Then store the knife in its box.
- The block is now ready for serial sectioning. Skip over Special Procedures to part C.
Special Procedures
If an Epon block had to be thick and thin sectioned off-angle (something other 0,0 degree block/knife setting), because the orientation of the tissue dictated it, then it presents a problem when trying to trim the block face to a tiny trapezoid (using the diamond trim tool). Here is one method to get around this problem.
A flat block can be tilted in a flat chuck, side to side. This flexibility is referred to as the “variable” position. It also has a “fixed” position within the flat chuck and this is due to the constraints of the clamps in the chuck.
If a flat block cannot quite fit into a flat chuck, it can be sanded down to fit. The same applies to a BEEM block. It too can be sanded down to fit into a flat chuck.
- To proceed, place the block into the flat chuck and secure tightly.
- Place the chuck into the specimen arm of the microtome and secure tightly.
-
Rotate the block so that the “fixed” position of the chuck sits in the specimen arm as diagrammed below. Align the knife-edge to the block face, adjusting the angle of the block and stage as needed. See diagram:
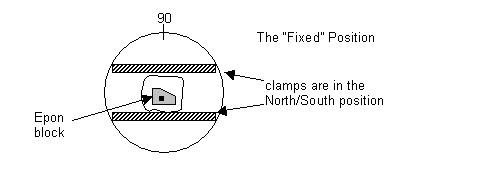
-
Take a reading of the tilt or angle in degrees of the block in the “fixed” position. This + or – value is important because the block will be tilted in its “variable” to conform to this value. So for example, if the value is +2 degrees in the “fixed” position, then the block will be manually tilted 2 degrees to match it. To do this, first, rotate the block to the “variable” position. See diagram:
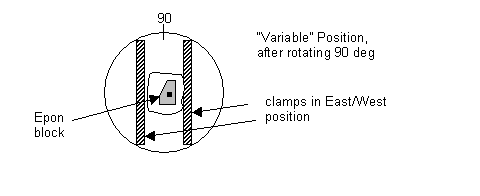
- Try to align the knife to the block. Either the top or bottom will inevitably be further away from the knife-edge. Therefore, this amount of tilt will have to be manually corrected. To do this, first remove the chuck from the specimen arm. Then loosen the block within the chuck. Then manually re-angle the block a bit in the direction needed to correct the tilt.
- Then secure the block back into the chuck. Return the chuck to the specimen arm.
- Secure the chuck back into the specimen arm.
- Check the alignment of the “variable” position now. If, at +2 degrees, the block in the “variable” position is now vertically aligned, then you have succeeded! Usually, success at this “back and forth adjustment” does not come so quickly. It usually takes several attempts of taking the chuck out, loosening the block, manually re-tilting the block, putting the block/chuck back into the specimen arm, re-checking vertical alignment at +2 degree, and so on and so forth.
- Now, if the “variable” position is indeed in vertical alignment at +2 degree, for example, then rotate the block 90 degrees to the fixed position. Re-check the vertical alignment at the “fixed” position. It should not have changed from the +2 degrees. It, on the other hand, might shift a slight amount. This could be a matter of 0.25 to 1 degree. You now have two options. One is that you can shave off a few microns to “even out” the difference. On the other hand, if you cannot afford to waste any tissue, you can keep the new value of +1.75 degree and manually re-tilt the block in the “variable” position so it too, will conform to +1.75 degrees. The whole point of this exercise is to keep the block face in the same plane when it is rotated.
- Write the “fixed” position value down in your notes, and keep the block locked into the same flat chuck until all possible series have been cut from it.
C. Cutting the Series.
- Set the knife clearance angle to 6 degrees, as recommended. Lock in this setting.
- Place the thin sectioning diamond knife into the knife holder and securely lock in.
- Fill the boat with enough water to be level with the knife-edge. Wipe away any surface debris on the water with a small piece of Ross Lens tissue.
- Set the cutting speed to 1 mm/sec.
- Set the section thickness to 40 to 60 nm, depending on desired thinness.
- Set length of cutting window, against the height of the block, not just the trapezoid.
- Close the door of the cutting room to reduce noise and distractions and shut off overhead lights.
- Have ready pre-cleaned eyelash hair sticks, 4 to 7 pair fine forceps, good quality coated slot grids, clean grid box, clean area around microtome, draft shield.
- Very carefully, advance the knife to the trapezoid area. Use the bottom light source only. Go to 4X magnification to really see the alignment. The knife-edge should be within a mm from the trapezoid.
-
Align the bottom edge of the trapezoid to the knife-edge. The bottom edge of the trapezoid and the knife-edge should be parallel to one another. Then retract the knife a few mm from the trapezoid. See diagram:

- When ready to begin cutting, place the draft shield on the stage area. Turn on the microtome and wait for appearance of the first cut section. One can manually advance the knife in half micron increments until it looks like a section is cut. Then allow the microtome to cut in the pre-set nanometer increments.
- Eventually one long ribbon of silver to platinum sections should appear.
- Do not stop the cutting until the required number of sections is cut or there is some problem. Usually a 10 um high trapezoid will yield up to 150 or more silver sections. Stop the microtome on the down swing. Then retract the knife a safe distance away. Remove the draft shield. You are ready to pick up the series.
D. Picking Up Serial Sections on Coated Grids
- Observe the disposition of the ribbon. Depending on how tiny each section is, it is possible to fit a long ribbon on one grid. The length of the open slot on a Synaptek grid (Ted Pella, Inc., cat # 4514) is 2 mm. The width is 1 mm. If the sections are not so small, then it will take several grids to contain a long series of e.g., 100 sections. Then it will be necessary to separate the ribbon into shorter segments.
-
One way to measure the length of the ribbon is to place the Synaptek grid near the ribbon. See diagram:
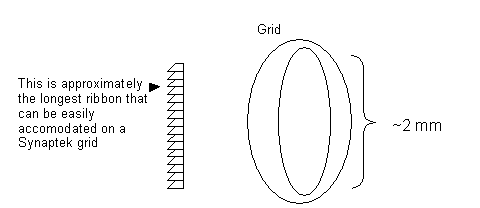
- Another way to measure a length of ribbon is to go up to 1X or 4X magnification, and use one square of the reticule to measure off how many sections fit in a square at a particular magnification.
- To separate a long ribbon into shorter segments, use a slightly blunted eyelash hair to poke gently at the breakpoint in a ribbon (this is near the juncture of two sections). Wet the eyelash tip in the boat water a bit before poking. It usually takes very little pressure to separate a ribbon. Do not poke too hard as this will pick up a section and then it is lost.
- If the ribbon breaks up on its own (which is unfortunate if it breaks up into too many small segments- this means the trapezoid north/south facets were poorly made or the block alignment to knife is bad), then somehow keep track of the order.
-
To pick up a certain length of ribbon on a coated grid, place the tips of the forceps in a 1:00 o’clock position on the narrow portion of the grid. Look at the film (Pioloform) quality under the binoculars for any imperfections. Use only the best coated grids. Next, use the eyelash hair to draw a ribbon segment to an isolated area in the boat. To do this, waft the water around ribbon in a particular direction. Avoid touching the hair to the ribbon as it can stick to it. See diagram:
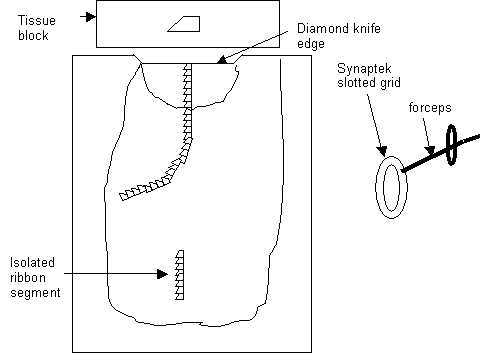
- There are many ways to pick up ribbons. One method is to submerse the length of the grid slot ¾ to 7/8 deep in the boat water, keeping the top area of the film dry as a “sticking point”. Tilt the bottom of the grid a bit towards the ribbon.
-
Then advance the grid to the ribbon area and waft the ribbon closer to the grid, using the hair or lay gently moving the grid back and forth. One end of the ribbon will attach itself to the dry film area, although it is impossible to see the actual contact. It is analogous to “threading the eye of a needle”. As soon as the ribbon end appears to contact the dry area, pull the grid straight up out of the water. See diagram:
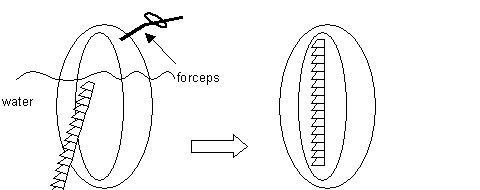
- Place this grid aside to air dry for several minutes. In the mean time, prepare to pick up the next ribbon. Keep the order of the series is mind if many grids are utilized.
-
Another approach to picking up a series, is to pick up a length of ribbon sideways. That is to say, place the tips of the forceps, angled at a 4:00 o’clock position, as diagrammed:
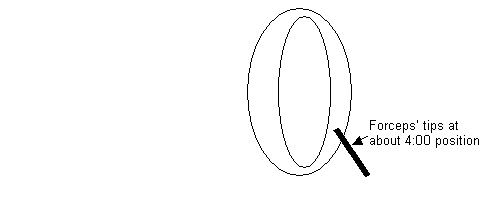
Then position the length of the grid parallel to the length of the floating ribbon. Then submerse the grid ¾ deep but leaving the top ¼ dry and above the water level. See diagram:
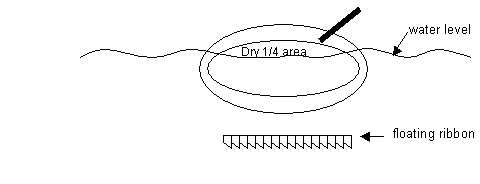
- To “lure” the ribbon over to the grid, slowly move the grid away from the ribbon. This action will pull the ribbon toward the grid. Then, move the grid toward the ribbon until it looks like they will touch. Try this back and forth wafting a few times to lure the ribbon closer and closer. When it seems the ribbon will contact the grid, then pull the grid straight up out of the water. Hopefully, the ribbon will now be on the grid. If successful, place the grid aside to dry for several minutes.
- Before storing any dry grids into a grid box, note if there is any residual water between the prongs. Wick this dry, and then store the grid in grid box.
- To really dry the grids, leave the grid box cover off. Place a sheet of Ross Lens tissue over the holes of the grid box. This will keep dust out as they dry. Allow several hours to overnight to air dry. Stain them immediately after this drying period with uranyl acetate, followed by lead citrate.
- Clean the diamond knife according to previous instructions (with a 100% ethanol-soaked beveled styrofoam rod. Then, rinse the knife-edge thoroughly in 2X distilled water). Store away if finished serial sectioning for the day.
Addendum: Abbreviated Step-by-Step Procedure for:
Trimming a Right Angled Trapezoid for Serial Sectioning
Following previous sectioning of the block at 0 degree block angle, 0 degree knife/stage angle, and then prepare to trim a trapezoid with one right angle, using the diamond trim tool (Diatome, US).
- Set knife (trim tool) clearance angle from 3 to 6 degrees (for trim tool) and lock this in.
- Place trim tool in knife holder and lock in.
- Set cutting parameters to 1 mm/sec cutting speed and 0.5 to 1 um section thickness.
- Decide on the orientation of your proposed trapezoid. Then rotate block 90 degrees, either CLOCKWISE or COUNTERCLOCKWISE, in order to trim the south/north aspects of the proposed trapezoid.
- To start trimming the south facet first, align right edge of knife to the proposed trapezoid area, in order to see a reflected cast shadow. If the overlying eyepiece reticule is a distraction, then move the stereomicroscope carrier a bit, so you are viewing the block face without the reticule in the way. Also, rely on the bottom light source solely for fine alignment as well as the highest magnification possible, i.e., 4x.
- Turn on the microtome’s fluorescent light, as needed. Set length of the cutting window.
- Position right corner of knife to proposed trapezoid south edge. If you are using the wedge trim tool, remember for every um deep trimmed, a um to the side of the block will also be trimmed!
- Turn on microtome cutting motor and trim away at least 12 microns or more (up to 30u). A 12-um-high pyramid yields ~130 silver 50 nm sections or more for a series.
- Stop microtome cutting on downswing. Retract knife stage 5 to 10 mm.
- Move knife/stage over the to the right. Do not change knife angle or block angle!!!!
- Position left corner of knife to proposed north edge of trapezoid.
- Trim away at least 12 um or more.
- Stop microtome on downswing. Retract knife/stage 5 to 10 mm. Trim the peripheral areas of Epon block as needed. Stop microtome and retract knife/stage.
- Rotate block exactly 90 degrees clockwise or counterclockwise, depending what you wish to consider as your north vs. south facets.
- Align left edge of knife to the raised horizontal area of the block, near the east edge of trapezoid.
- Set the length of the cutting window.
- Position the left corner of knife to proposed east edge.
- Trim away at least 12 um or more.
- Stop microtome on downswing. Retract knife stage 5 to 10 mm.
- Move the knife over the left. Rotate block 2 to 2 ½ divisions COUNTERCLOCKWISE.
- Align right edge of knife to the remaining area of the raised region.
- Set length of the cutting window. Position the right corner of knife to proposed west edge of trapezoid.
- Trim away at least 12 um or more.
- Stop microtome on downswing. Retract knife stage 5 to 10 mm.
- Trim the peripheral areas of Epon block as needed. Stop microtome and retract knife/stage.
- Rotate block CLOCKWISE 2 to 2 ½ divisions to original position.
- Use this opportunity to use the trim tool knife-edge to do a ballpark alignment of the newly created trapezoid. First, align bottom edge of trapezoid to knife-edge. Adjust knife/stage angle and/or rotate block as needed. Secondly, align knife-edge against trapezoid face, if possible, to see a cast shadow (trapezoid may be too tiny to do this step). Adjust knife/stage angle if needed.
- When finished, then clean diamond trim tool and store away.
- Set the knife clearance angle to 6 degrees and lock it in.
- Place thin sectioning diamond knife in knife holder and lock it in.
- Change microtome cutting parameters to thin sectioning parameters. Retract block if necessary.
- Reduce water level in knife slightly so water does not interfere with alignment.
- Align knife-edge to bottom edge of trapezoid. Rotate block slightly if needed. Also adjust knife/stage angle as needed
- Align knife-edge to block face for a reflected shadow, if possible. Adjust knife/stage angle as needed.
- Next, prepare to serial section the block!