Materials: Any type of grid that needs film coating but in this lab we use Synaptek slot grids (Ted Pella, Inc, cat # 4514), an Effa film caster (Electron Microscopy Sciences, Cat# 7130501), Plexiglas box stage, glass bowl of at least 7” diameter, black paper to cover the glass bowl, curved forceps, some powdered dishwasher detergent e.g., Alconox, 2 glass Petri dishes approx. 90-mm diameter, 70% ethanol, Ross Lens tissues, plain glass microscope slides (VWR Scientific Products, cat # 48300-036), a 1 to 1.2% Pioloform (Ted Pella, Inc., cat # 19244) chloroform solution, chloroform (American Bioanalytical, cat # ab350), a timer, a small jar containing filter paper (Whatman) and partly filled with silica gel #6-16 mesh dessicant beads (VWR Scientific Products, cat # 26668-109), single edged razor blades, Parafilm, plastic Petri dish sets 90-mm diameter, Whatman filter paper 90 mm diameter, gooseneck lamp, pen, safety goggles, gloves, lab coat and/or apron, fume hood.
-
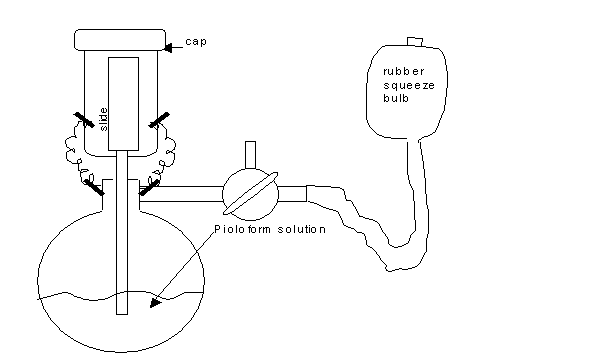
Select a dry, non-humid day, to coat grids. High humidity seems to diminish film quality. See diagram of set up of the Effa film caster in a fume hood for coating glass microscope slides:

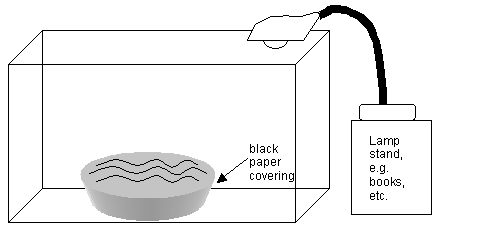
The rest of the set up can be outside of the fume hood for casting the film on water. See this diagram:
- Before setting anything up, dissolve about ½ teaspoon of concentrated dishwasher detergent, e.g., Alconox, in double distilled water in each glass Petri dish. It seems to take at least a half an hour to partially dissolve. Or try mixing or sonicating to speed up things up. The Pioloform solution can be made up the day before (see Special Procedures at end of this section for recipe) or can be up to several months old. An old Pioloform solution may not be effective.
- Wear safety goggles, gloves, and lab coat while working in fume hood with the Effa film caster. Assemble the Effa film caster by inserting the upper glass cylindrical tubing into the round, volumetric base. Then, rinse the Effa film caster once with chloroform. Discard this chloroform in appropriate waste container. Next, add about 150 to 200 ml of the Pioloform solution to the Effa film caster. Secure the Effa with its little metal springs and glass cap. The rubber tubing with squeeze bulb can always stay attached to the side arm of the glass base.
- The bottom and sides of the glass water bowl should be covered in black plastic or paper to shut out reflective light. Fill this bowl to the brim with double distilled water and place it in the plexi-glass box stage as diagrammed above. Set up the gooseneck lamp to illuminate the water surface through the roof of the stage as diagrammed above.
- Once the soapy, dish detergent solution is ready, prepare to wash the glass slides. To do this, first rinse each slide with 70% ethanol and scrub it clean with Ross Lens tissues.
- Rinse each slide in running double distilled water to remove all ethanol.
- Dry each slide well with Ross Lens tissues and place each slide in the soapy solution. Prepare a number of them in this way. It only takes a minute of soaking to soap-coat a slide. Or the slides can sit in the soapy water for several hours, if necessary.
- Take one slide out of the soapy water and scrub it dry with Ross Lens tissues. Hold one end of the slide with a lens tissue while drying the rest of slide. Avoid putting any fingerprints on the slide.
- Transfer this slide to the upper chamber of the Effa film caster and place the glass cap on the top of the chamber as shown in the first diagram.
- Turn the stopcock so it is in the “T” position, to only allow pumped air into the bottom chamber.
- Squeeze the bulb rapidly to force Pioloform solution to gravitate up into the upper chamber to coat the glass slide. Try to only coat the lower ¾ of the slide and leave the top ¼ dry for handling, if possible.
- As soon as the upper chamber is ¾ filled with Pioloform solution, stop squeezing the rubber bulb. Then slowly turn the stopcock clockwise until the solution begins to drain down back to lower chamber. Do not turn any further as it is draining, unless you are trying to control the rate of draining. Allow the upper chamber to drain undisturbed. It is the rate of draining that controls the thickness of the film. Too fast a drain rate results in a thicker film (gold to purple interference color). Too slow a drain rate results in a thin film (gray interference color). It is personal preference that guides film thickness. A moderate rate of solution drain seems to result in a medium to heavy silver interference color, indicating a certain film thickness. This medium to heavy silver film color is preferred for serial sections, as this thickness is rugged enough to sustain all the handling involved; yet, the resolution under the electron beam is not compromised. Once the rate of drain is controlled for, then note if the film continues to come out too thin or too thick. If this is the case, then the Pioloform solution can be made more concentrated (add more Pioloform powder) or dilute (add more chloroform).
-
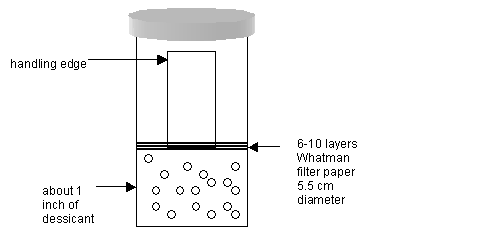
As soon as the Pioloform solution is drained from the upper chamber of the Effa film caster, then quickly remove the slide and transfer it into the small jar that contains desiccant. See diagram:

Allow the slide to dry in this jar for one minute exactly. Carry the jar/slide over to the next station, that is, the Plexiglas box stage area. - Remove the slide from the jar and prepare to cut the film on the glass slide. To do this, hold the glass slide by its handling end and brace it at an angle against a clean area of a counter top, for example.
-
Use the corner of a new razor blade to make cuts along the edges of both sides of the glass slide. See diagram:

-
Next, position fingers on the handling end of slide. Then, submerse the slide into the bowl of water, about ¾ deep – just a quick dip to wet the slide. Avoid touching the water with your hands, as the water must stay clean. See diagram:

- Then, slowly re-dip the length of the slide into the water. The film from each side of the slide should release onto the surface of the water. Shine the lamp from above to reveal the interference color of the film. Note any mars or blemishes in the films. Discard any unusable films, by wiping the surface of the water with a Ross Lens tissue. On the other hand, if the film doesn’t release at all, then suspect that there wasn’t enough of a soapy film on the slide, or that the soap solution was contaminated. Alternatively, one can try re-cutting the glass slide with razor, as described above, or try re-dipping the slide more slowly into the water. There may be the possibility that the glass slide itself is a poor releaser. In that case, try another brand of glass microscope slides.
-
Once the film(s) is floating on the water’s surface, look for the best areas on it to drop grids. Position the lamp so it bests illuminates the floating films. If using notched Synaptek slot grids, pick up the grid, notch side up, with the curved forceps as diagrammed:

- Drop the grid onto the good areas of the film. Place as many grids as desired onto the good areas of the floating film. When finished, return to each grid and gently press one edge of the grid lightly, with a closed forceps. This will help to attach the grid to the film.
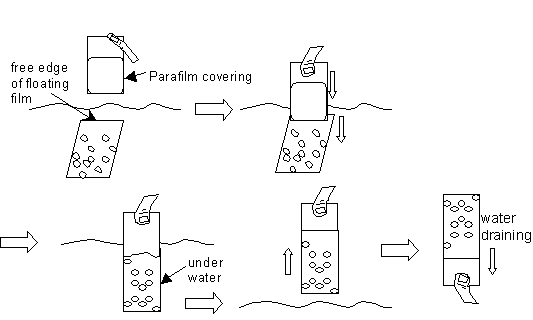
- Prepare to pick up the load of grids. To do this, first stretch about a 2 inch length piece of Parafilm over a clean, dry glass microscope slide. Do not touch the “good” surface of the Parafilm, as this side will be in contact with the “film of grids”.
-
Position the end of the Parafilm-covered slide above the “free” end of a floating film. Then dip slide into the water to catch this free end and continue to plunge the slide deeper straight into the water in order drape the entire film of grids onto the glass slide. Then pull the slide straight up out of the water. Invert the slide for a minute to drain any water out of the slide. See diagram:

- Have ready the plastic Petri dish sets (90-mm diameter) with filter paper (also 90-mm diameter) lining the bottom dish. Label the dish or filter paper with today’s date and with anything else appropriate.
- Place the microscope slide containing the grids, grid side up, into one of these dish sets for storage. The grids can be used on the next day. These grids should be ultimately inspected in the electron microscope before using with thin sections. Select one or two grids from each glass slide and examine under 5000X to 10,000X magnification. The film should look blank. If it shows many holes (several small holes are acceptable) or many streaks or tracks, then discard this batch of grids. You can recycle the Synaptek grids, however. Many streaks indicate that the glass slide itself, used in film coating, is casting its own impression. Try another brand of glass microscope slides.
- Coat as many such grids as needed for up to 6 months or more supply.
- When finished for the day, pour the Pioloform solution back into its original container and seal the cover with Parafilm.
- Rinse the Effa film caster apparatus four times with chloroform. Discard the rinse chloroform into an appropriate container.
- Separate the upper chamber from the bottom chamber and allow these parts to dry overnight in the fume hood. On the next day, store the film caster in an appropriate area.
Special Procedures
Pioloform-chloroform recipe:
Materials: Pioloform powder (Ted Pella, Inc., cat # 19244), ultra-pure chloroform (American Bioanalytical, cat # ab350), a 250 ml capacity (approx.) amber glass jar with lid, Parafilm, stir bar, a 250 ml graduated cylinder, stir plate, top loading balance with draft shield, weigh boat, fume hood, lab coat and/or apron, gloves, goggles, surgical mask (optional).
- Pre-rinse the amber bottle, graduated cylinder and stir bar with chloroform in the fume hood. Discard the rinse chloroform into an appropriate container.
- Next, add 200 ml of chloroform into the amber bottle and add the stir bar. Cover this bottle and place on stir plate, also located in the fume hood.
- Weigh out 2.4 g of Pioloform powder (for a 1.2% solution) in the fume hood.
- Slowly add the 2.4 g of powder to the 200 ml of chloroform while it stirs.
- Continue to stir the solution until all the powder is dissolved.
- When complete, wrap some Parafilm around the cover of amber jar. Store in an appropriate area at room temperature.
Repairing a hole in a coated grid
-
If a hole or tear is present in a coated grid, distant to a stained ribbon of serial sections, for example, then, it is possible to repair it. See diagram:

- To do this, use the same equipment used in coating grids. The exception is that the Pioloform solution has to be more dilute (0.6 to 1%) or the film has to be very thin so the final grid film thickness does not compromise resolution under the electron beam.
- Prepare a thin film (coating a clean but soap-filmed glass slide in Effa film caster) and release it on the water surface.
- Choose an area that is gray in interference color. Carefully place the slotted grid that has the hole onto a good area of the film, Epon section side down. Then gently press the grid onto the film a bit.
- Pick up the film with a Parafilm covered glass slide, as previously described.
- Store the slide in a clean Petri dish set. Allow the grid to dry at least overnight. This should do the trick for grid repair!